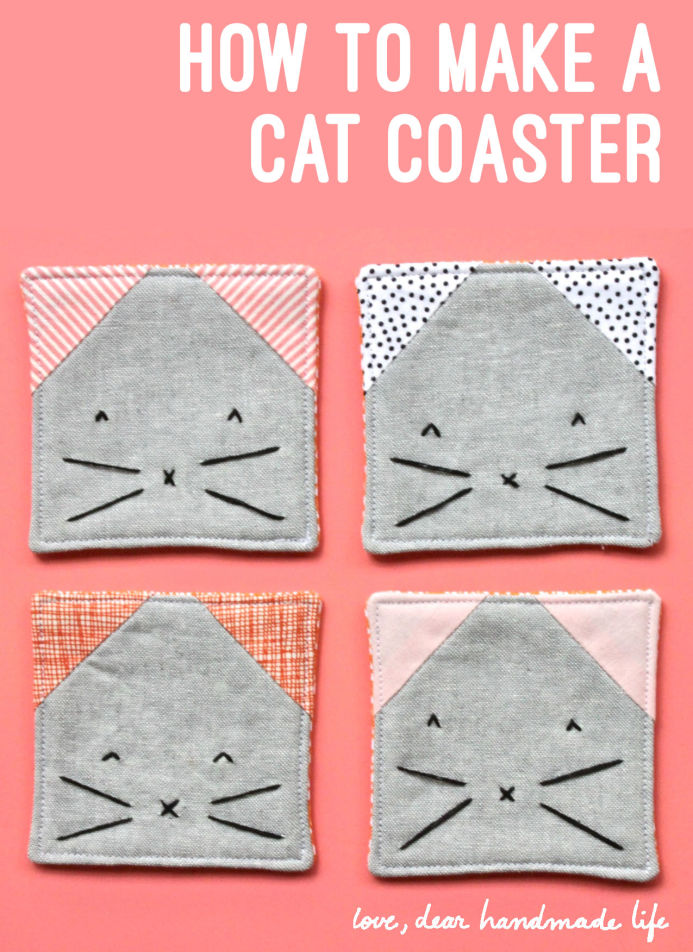
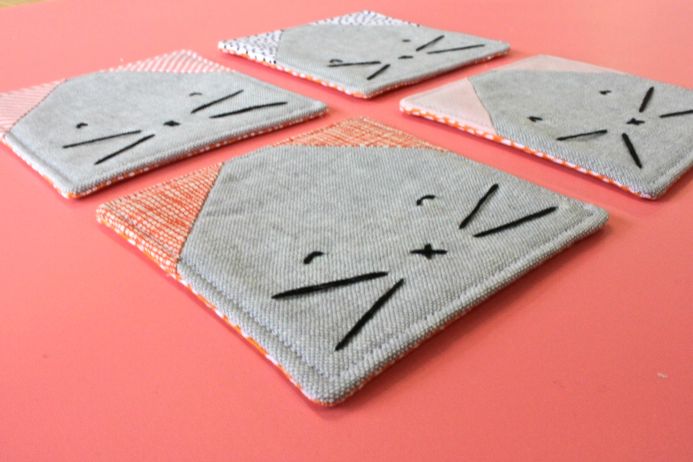
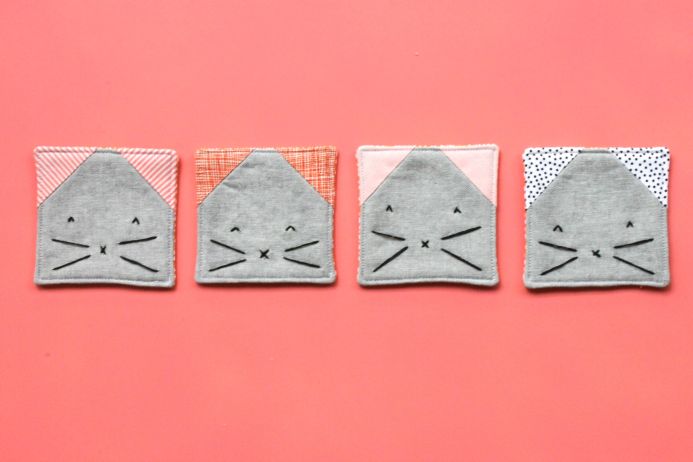
How to make a Cat Coaster
When I was a kid, my family was very much a dog family. We’ve had several dogs throughout the years and I have developed a profound affection for their playful, super friendly and loyal nature. Once, when I was in high school, a friend found a kitten inside of a dumpster and brought him over to our house as a gift. After much pleading and promising to my parents, I had become the proud owner of a sweet little kitten. Well, that sweet kitten eventually turned into a very grumpy and scratchy cat and I started to develop allergies. Constant watery eyes and non-stop sneezes forced our cat to a life of living outside, until one day, he was just gone.
I think my short stint as a cat parent reaffirmed my deep love for dogs, and maybe even left a scar on my heart where people normally store their affection for cats. When my husband came into my life, he brought his big heart, gentle love for the feline species and heartwarming childhood cat stories with him. There was no hope for us; he was definitely a cat person. So while we may not know what our future pet might be (ahem, a dog!), I try to cheer him up with kitty-themed surprises to let him know that I do care.
So in honor of my husband and his cat-loving ways, I whipped up this sweet little coaster set! It’s created using a method called foundation paper piecing, and this project is a perfectly simple introduction! It’s also a wonderful way to use up some of your larger fabric scraps.
-LISA RIOS
WHAT TO GET:
Large quilting-weight cotton fabric scraps
Fusible batting
4 x template printed on text-weight paper *Click HERE to download the template*
Sewing machine
Basic sewing toolkit (pins, fabric sheers, seam ripper etc.)
Rotary, self-healing mat and acrylic ruler (optional)
Craft scissors
Thread
Iron + ironing board
Embroidery floss
Hand needle
WHAT TO DO:
Step 1:
Cut out all of your pattern pieces. Make sure that you’re cutting them about ½” larger on all sides than they appear on your paper pattern. I like to place a piece of tracing paper over my pattern piece to draw a larger pattern pieces to cut my fabric from. If in doubt, always cut you fabric larger than you think you need. You can always trim it down later.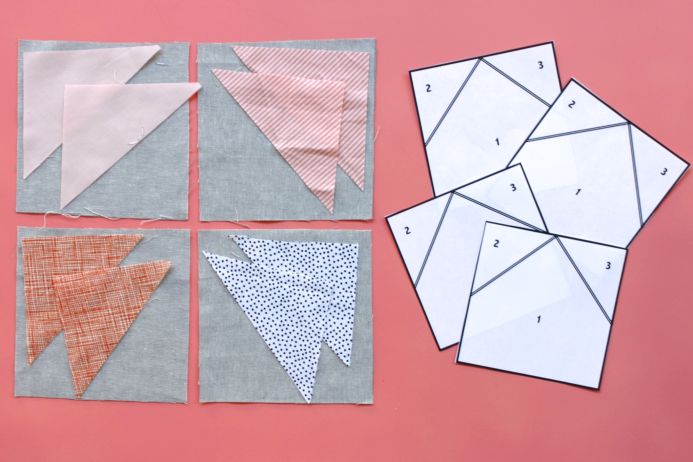
Step 2:
Center the paper pattern over your fabric (remember, fabric should be larger) and pin together, wrong sides facing each other.
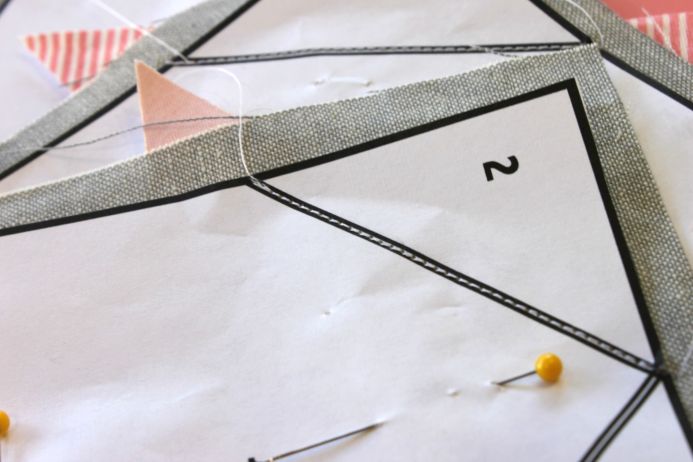
Step 3:
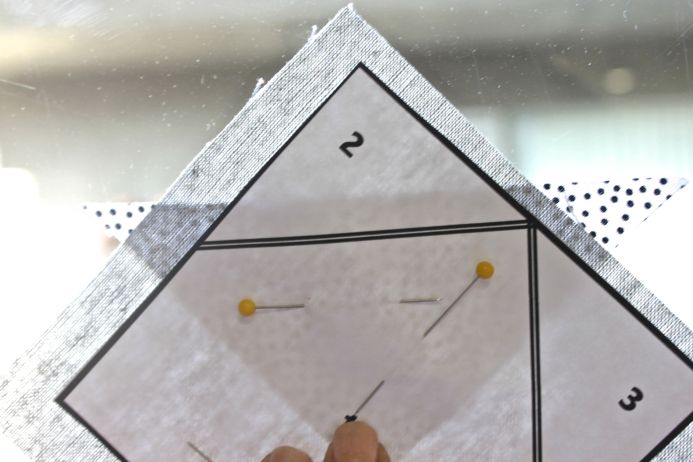
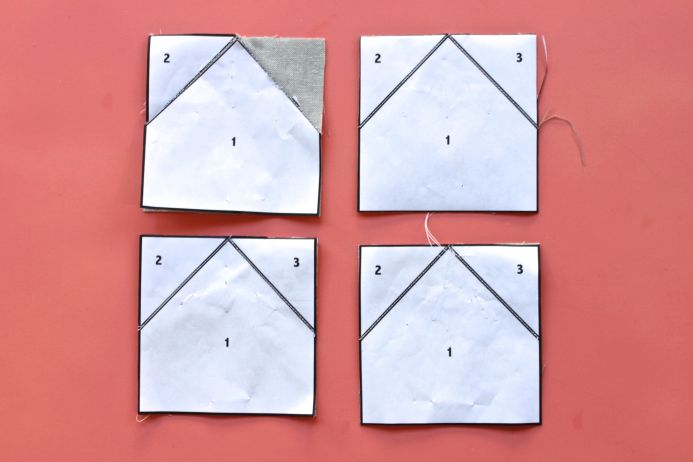
This is where it can get kind of tricky at first, so use the photo as a guide. We’re going to pin our first ear, which will go where section ‘2’ is. Place your ear, right sides facing together with your main fabric. Pin it just like it is shown in the photo. It helps if you hold your project up to a sunlit window, since we’ll need to keep our paper pattern facing us to serve as a guide as to where to line up the first seam. Make sure to leave at least ¼” seam allowance.
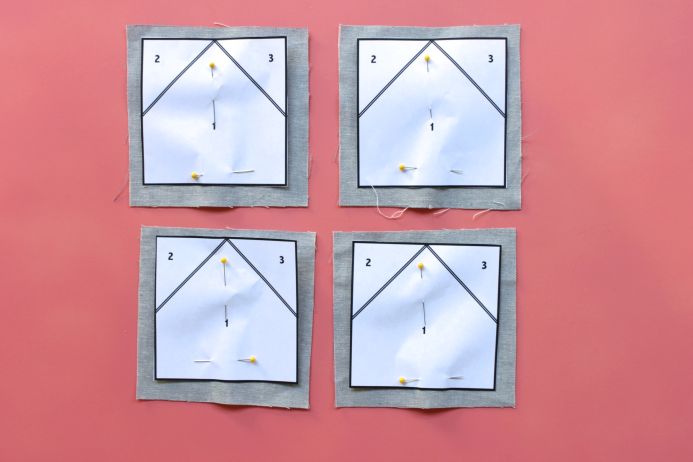
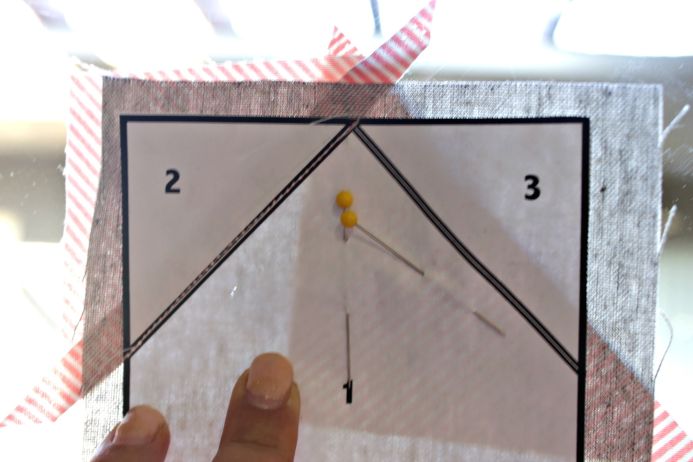
When they’re all pinned, they should look like this.

Step 4:
Set your stitch length to 2 mm and sew the line between section 1 + 2 with your paper facing you. Make sure to backstitch at the beginning and end of your seam.
Step 5:
Remove the pin holding section 1 and 2 together, and turn over. Fold the ear piece up toward the top left corner (right side facing up) and iron.

Step 6:
Pin the next ear as shown in the photo.
Step 7:
Sew the line between 1 + 3. Remember, you are sewing with the paper facing you!
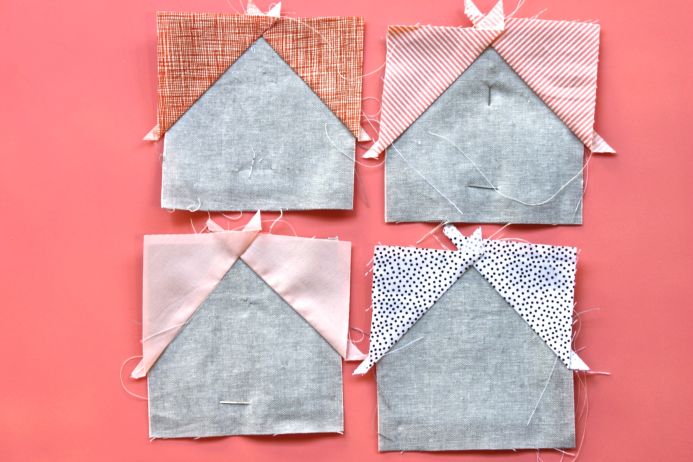
Step 8:
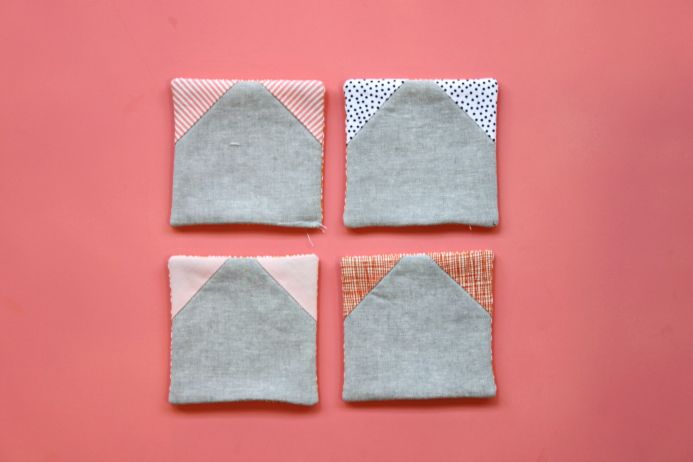
Remove the ear pin and iron the ear back just like you did with the first. Don’t they almost look like little houses? Adorable!
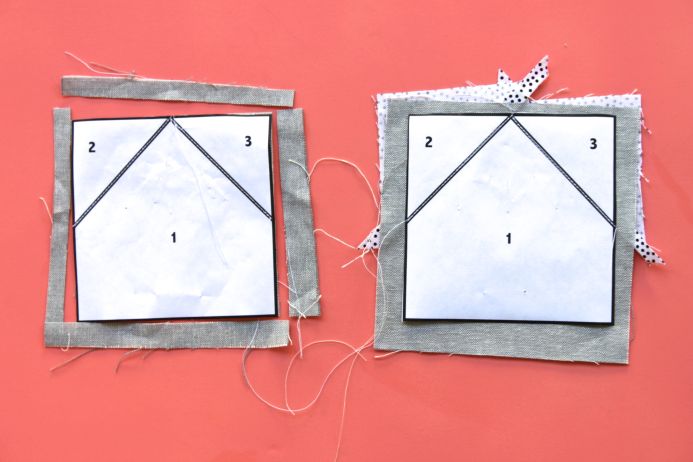
Step 9:
Remove all pins and trim off excess fabric with your rotary.
Step 10:
Gently and slowly tear away the paper back (this step is why we needed to sew with such short stitches; it perforates the paper and makes it easier to remove).
Step 11:
Cut 4 square pieces for the backing fabric, and fusible interfacing using your paper pattern piece as a guide.
Step 12:
Iron the fusible interfacing to the wrong side of your quilted cat face. Refer to the instructions on the package if you need help.
Step 13:
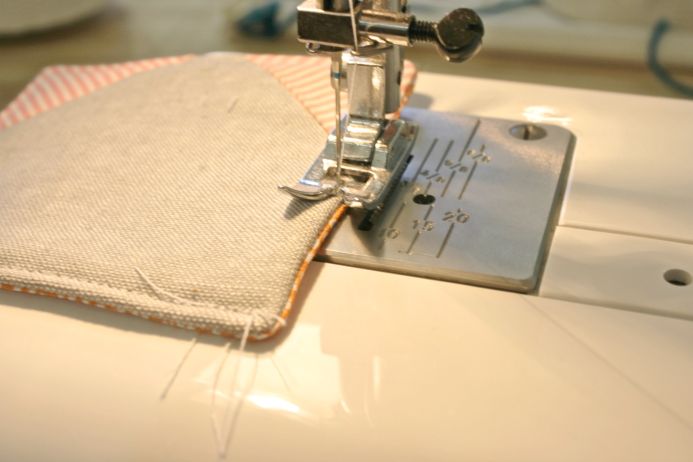
Place the right sides of the front and back of your coaster together and sew around the perimeter using a 3/8” seam allowance. Make sure to leave a hole to turn the project right side out.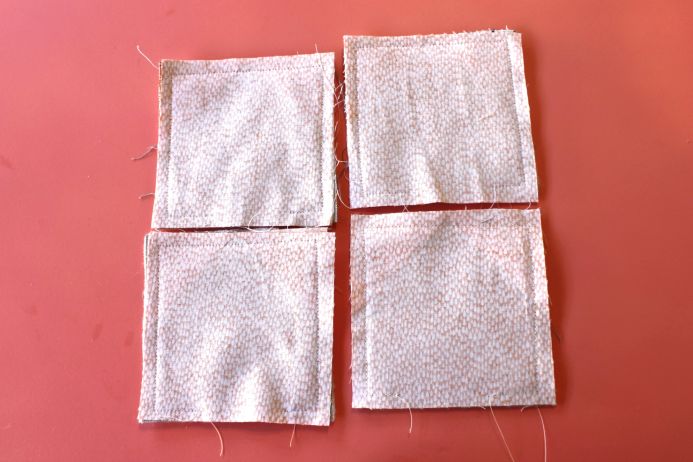
Step 14:
Turn project right side out and iron.
Step 15:
Topstitch around the top of your coaster using ¼” seam allowance, and trim off any stray threads.
Step 16:
Leave blank, embroider or paint a cute cat face! To embroider, only sew through the top layer of the coaster. If you decide to paint, the freezer paper stencil method is awesome. Just make sure to mix in some fabric medium with your paint and set with a hot iron when you’re done.
This project only takes an evening, but will provide you with a lifetime of smiles! If you are new to sewing, feeling a bit rusty, or want to add some new skills to your sewing repertoire, head on over to the website for my craft studio The Makery and check out our latest sewing workshops and open-studio sewing labs.
About Lisa:
“If you had asked my 12-year-old self what I wanted to be when I grow up, I probably would have had a perfectly sensible answer. Like a circus trapeze artist or an outer space explorer. Never in my wildest dreams could I have imagined that I would craft for a living. But fast-forward 20 years and I’m the owner of The Makery, a walk-in craft studio located in Anaheim. In addition to teaching and organizing local creative workshops, planning craft parties and designing handmade craft kits, I also design for Whimsy and Ink, the handmade biz I share with my rad hubby. My work has been featured in Real Simple, Brides Magazine, Bust, The Huffington Post, Orange Coast Magazine, Sunset Magazine, in Etsy’s Featured Sellers series, and in my mom’s emails to Grandma.”


Lisa, so cute as always your crafts are and with easy to follow instructions. I too am not a cat person, but such a lover of dogs (so a dog person) that I can appreciated anothers love for cats.
Thanks, Stephanie! I may be a dog lover but it’s hard to deny that cats are adorable. This was a fun project to make 🙂
Cute cute cute!! I’ve got a Craft Gossip post scheduled for this afternoon that links to your tutorial:
https://sewing.craftgossip.com/tutorial-kitty-coasters/2015/02/07/
–Anne
Thank you so much Anne! Super excited to be featured on Craft Gossip.
These are super cute!
These coasters are adorable. Thank you for the pattern. They are going to look great!