
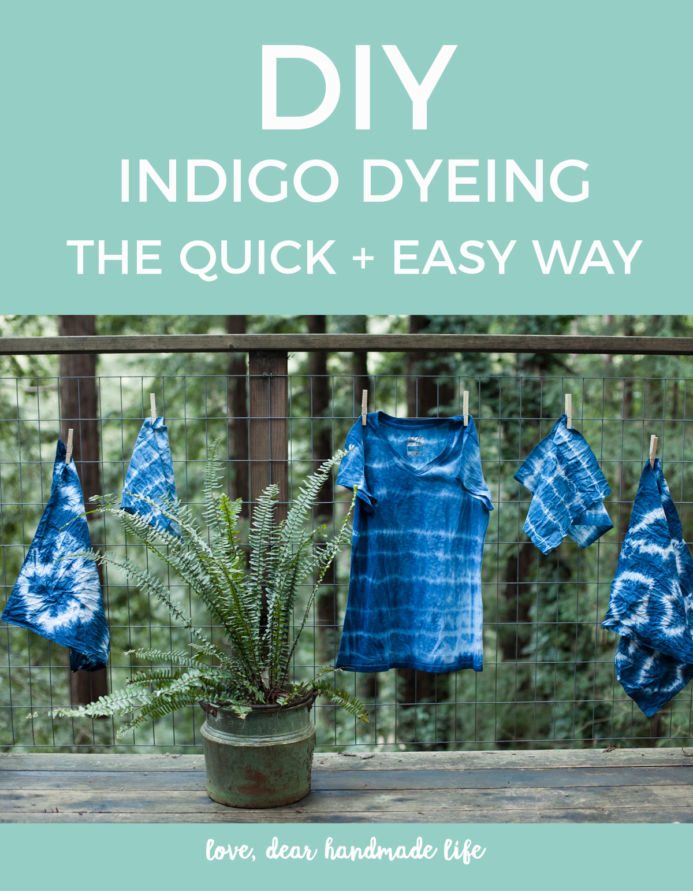
DIY Quick and Easy Indigo Dyeing
Indigo Dyeing Kit Giveaway!
Our friends from Dharma Trading Co. are going to send one lucky winner an indigo dye kit so you can get started and fall in love with indigo dyeing like we have!
To enter the giveaway just leave a comment on this post by 3.23.17 letting us know what you’ve been making lately or what crafty thing or technique you’re looking forward to in 2017! Be sure to include include your email address so we can contact you to send your kit if you win. -Nicole S.
DIY Quick and Easy Indigo Dyeing
A couple of years ago we joined craft bloggers around the world with a blog post on Indigo Dying. It was a fun process that we enjoyed on a sunny day but it was incredibly time consuming – and messy. Thankfully, we tried out Dharma Trading Co.’s Indigo Tie Dye Kit and it was our easiest dye experience to date! Everything is pre-measured, the instructions are straightforward, and we were able to make a handful of beautiful pieces in only one hour. We’re excited for Craftcation attendees to use the kits this year in Anna Joyce’s indigo dyeing workshops.
Granted, there is a beautiful and complex history to the Shibori dying technique and not all vats are created equal, but it’s hard to argue with a kit that will dye 15 pounds of fabric for under $10. You’ll still want to make this a group activity though – it seems like we can never use up all the dye ourselves. Ideally, dying should be done in full sun as it is supposed to aid in the oxidizing process, however, we dipped our pieces on a gloomy day and they still came out great.
What to get:
Dharma Trading Co. Indigo Tie Dye Kit which includes:
-20 grams Pre-Reduced Indigo
-150 grams Reducing Agent
-Plastic Gloves
-Rubber bands
-2 wood blocks
-Instructions and a booklet on folding techniques
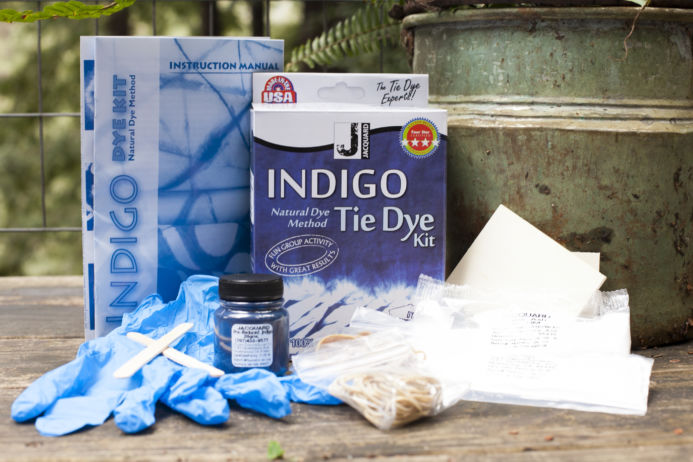
You’ll Also Need:
-Natural fabrics for dying
-A dowel or wooden stick
-5-gallon bucket
-Scissors
-Face Mask
(photo kit1-4)
What to do:
Step 1: Prepare the Dye
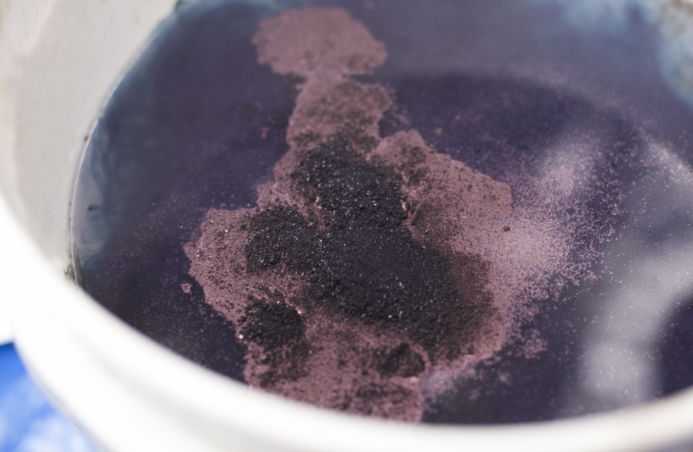
Begin by boiling a great big pot of water. The ideal temperature is 120 degrees, but since we didn’t have a thermometer we brought the water to a boil and then added cold water to the bucket. A 5-gallon painter’s bucket is the perfect size – just make sure to leave room so the dye doesn’t overflow when you dip.
While your water boils prepare your area by laying down a tarp or drop cloth. This gets MESSY and try as might you, the dye will get everywhere so don’t wear nice clothes, either. Set out the kit and everything else you need on the tarp.
Once you have your bucket of warm water begin by adding the indigo powder. We do recommend using a face mask for this as some powder will waft up into the air.
Very slowly stir your indigo powder into the water. It will look blue on the surface and green underneath. Don’t worry if some powder does not dissolve – it won’t affect your dye job.
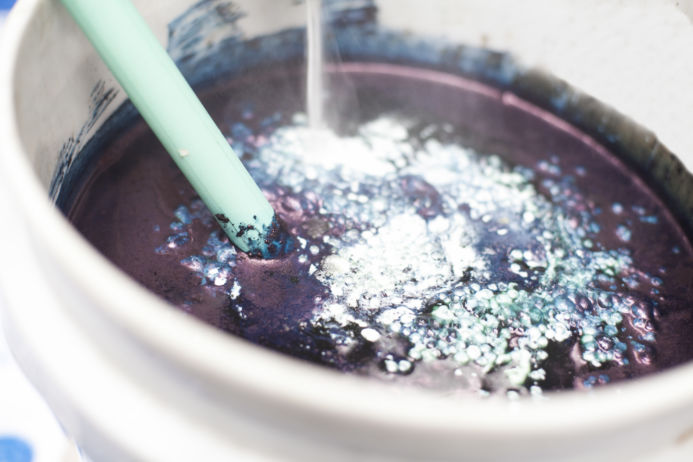
Next cut open the two white packets and add those to the water, very very slowly. The reducing agents take all of the oxygen out of the water, which is what makes the dye stick to fabric. Have a friend use the stick or dowel to slowly stir the powder in while you pour. Make sure to stir slowly, as whisking will introduce more oxygen to the dye.
Once the powders have dissolved, cover the bucket and let it sit for 15-30 minutes. A lid is ideal as it will keep the heat in, but we covered ours with part of the tarp and it worked fine.
Step 2: Preparing the Fabric
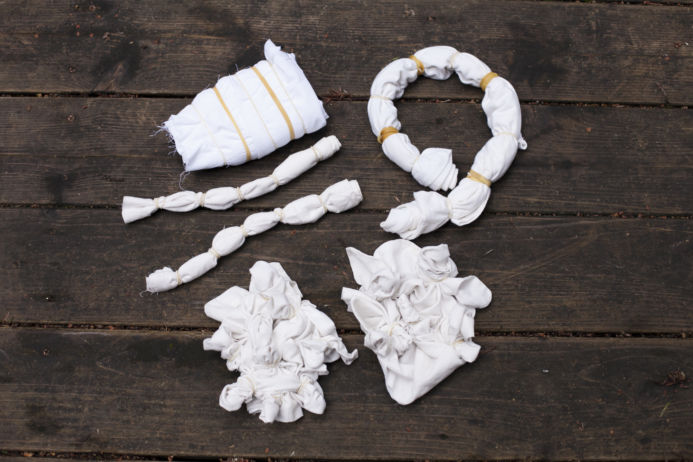
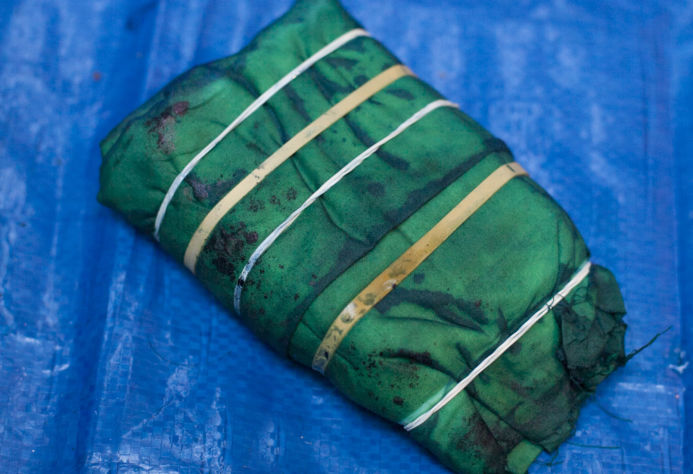
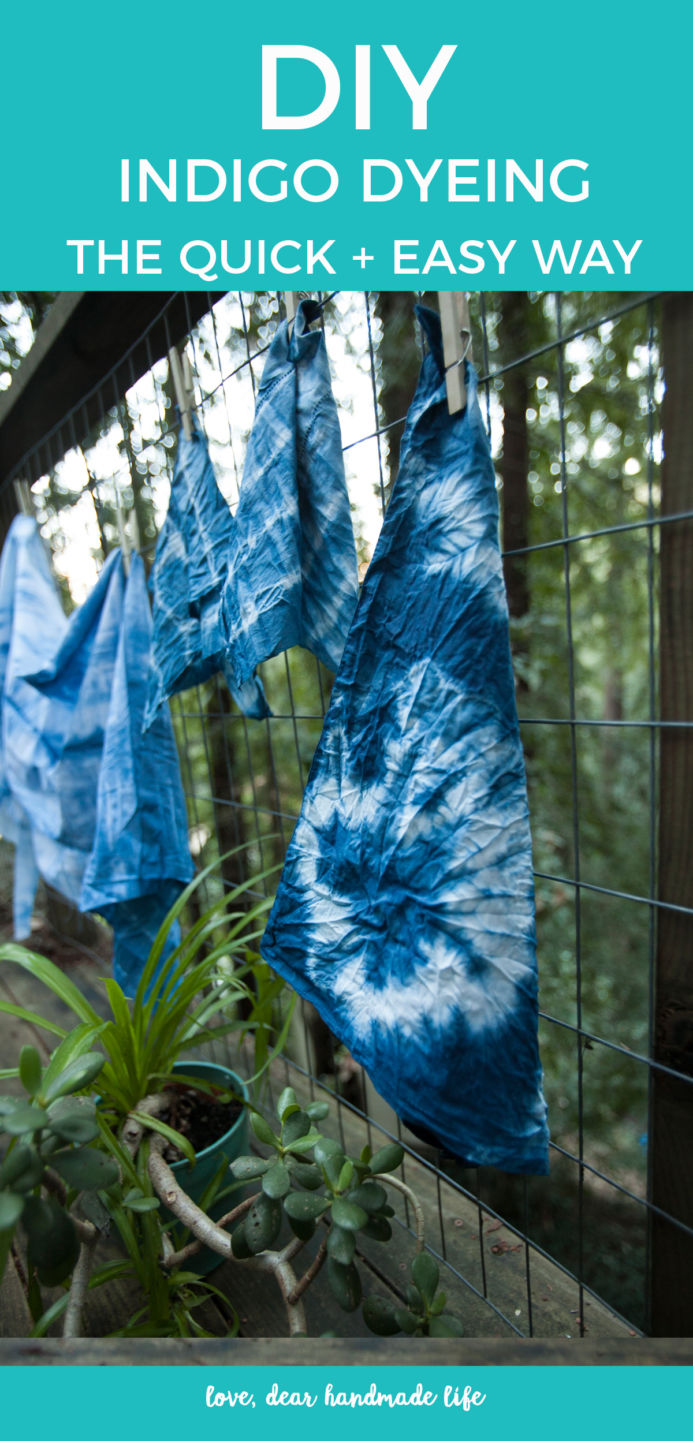
While your dye is becoming beautiful you can prepare your fabric. Make sure to use pre-washed, natural fabrics as those adhere the color the best. Use the rubber bands, popsicle sticks, and little wood boards to tie, wrap, fold, and twist your fabrics. Wherever the fabric is bound will leave a white mark. You cannot do this part wrong – any method seems to look good with indigo.
Step 3: Dipping the Fabric

Definitely wear gloves for this part! You can use the plastic gloves included in the kit, but we like using big rubber gloves – they’re easier to reuse and go up higher on your wrist.
Take the lid off the bucket and you should see some foam on the surface – these are called blooms. Pro-dyers can cultivate some huge blooms, but we didn’t have much going on in our vat this time. The dye seemed to work all the same.
Before dipping your fabric you have to pre-wet it. You can do this by dipping it into another bucket with clean water or just hosing it down. Squeeze out any excess water. By now you may realize that everything has to be done slowly. So, very slowly dip your pre-wet fabrics into the dye and let them go only after they are fully submerged. You want the water to be as still as possible to keep the oxygen out.
You’ll notice the fabric turning green – that’s ok! They won’t turn blue until out of the water. Let the fabrics soak in the indigo for 10 minutes.
Step 4: Cultivating Shades
After waiting, pull out your fabrics very slowly while squeezing off excess dye. Make sure not to splash! You’ll then watch the beautiful transformation of color. You can pull up the folded parts and make sure the insides are getting exposed to oxygen, as well.
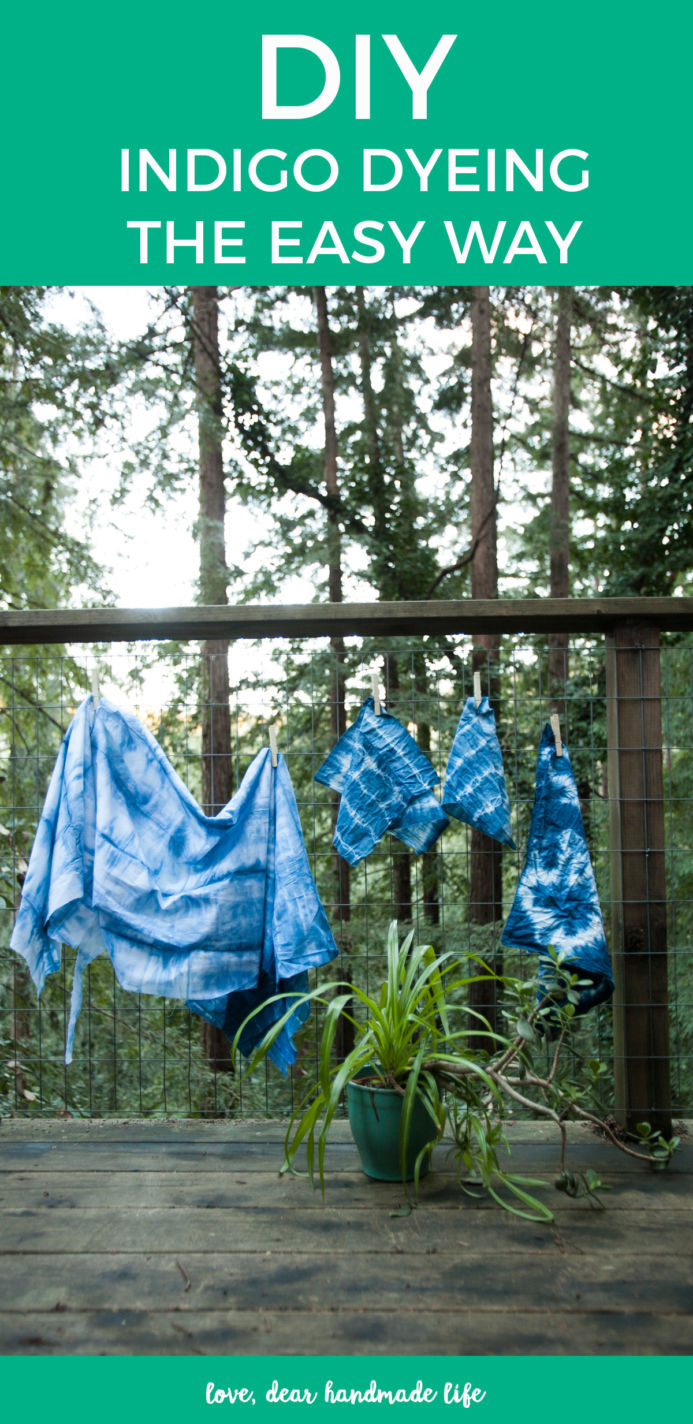
Let the fabrics sit out for about 5 minutes to allow the oxygen to reach all the fabric. It’s helpful to have a clothesline to hang the pieces as setting them on the ground will stop oxygen from reaching the bottom.
If you’re only looking for a light indigo you can stop here. The more times you dip, soak, and then expose the fabric to oxygen the darker the blue will become. For the deepest indigo you may want to dip your fabric up to 3 times.
Step 5: Caring for Your Indigo
Once you are finished dying, unwrap you fabrics to reveal the beautiful patterns. Hang them up to dry and get full oxygen to all the corners. You’ll definitely want to do this over a tarp as the wet fabrics will drip.
Once dry you should wash your pieces in cold water with a mild detergent. The color will fade slightly, but this is un-avoidable. Some people swear by using a vinegar rinse to keep the color but we’ve found that the fading is minimal either way.
Step 6: Enjoy!
Your fabrics won’t bleed much after their initial washing so feel safe putting them in with other dark clothes. We hope you love your indigo dye job!
The contest is now closed. Congrats to Kristen!

“dyeing” to create something since craftcation 2016. just got a new anna joyce dress so now need to make something of my own. 🙂
I’ve been doing more block printing this year – but not enough! I’m super drawn to patterns, textiles, and prints.
I would love to win an Indigo Dye kit from Dharma! I work in front of a computer all day and would love to unplug and slow down with some Indigo dyeing. Thank you!
I would love to win this kit! I currently make silver rings and bracelets and would love an opportunity to work in a soft and brightly colored medium for a change. <3
I’ve been getting into book binding lately, the perfect combination between my two dearest hobbies which are crafting and writing poetry. I’ll put together a poetry zine, print it out and bind it into a book. I only know one kind of book binding stitch thus far, but I am dying to learn more. For me, indigo dye would be related to book binding in the way that I want to try indigo dye because I’ve been thinking I could indigo dye fabric to use on the covers of my bound books.
I took a indigo dyeing class at my local arts council last month…I’m hooked! It was a one day class, not nearly enough time to explore all the possibilities. Would love to win this kit! Thank you!
I’ve been playing with Procion MX for the past year, and I’d LOVE to try out indigo dyeing. I want to experiment more with surface design this year.
Worked on a challenge quilt for my quilt guild and 2 other quilts.
I’ve just drafted a pattern for a kimono and dream of fashioning it out of my own indigo dyed fabric.
This looks like so much fun. I would love trying a new craft which would produce lovely things to use and wear! I’d like to both tie dye and use wax to resist the color. Maybe find some batik stamps, could combine techniques on the same piece…… Endless!
I really want to make some new tie-dyes this summer. I think indigo would be a lot of fun too.
I’m perfecting my ice tie-dye techniques. took a shibori class recently where we used indigo dyes–fun!
Would love to try shibori style dying.
Thanks for the info! Good, clear directions. I love dying! Such a fun way to completely change the look of something, and always anticipate the surprise of how it will turn out….like opening up a cut snowflake!
Oh, how I want to do a whole set of Onesies in Indigo.!
This looks like a blast! I just recently took a soap making class, so I’m excited to make limited ingredient soaps to add more products to my brand!