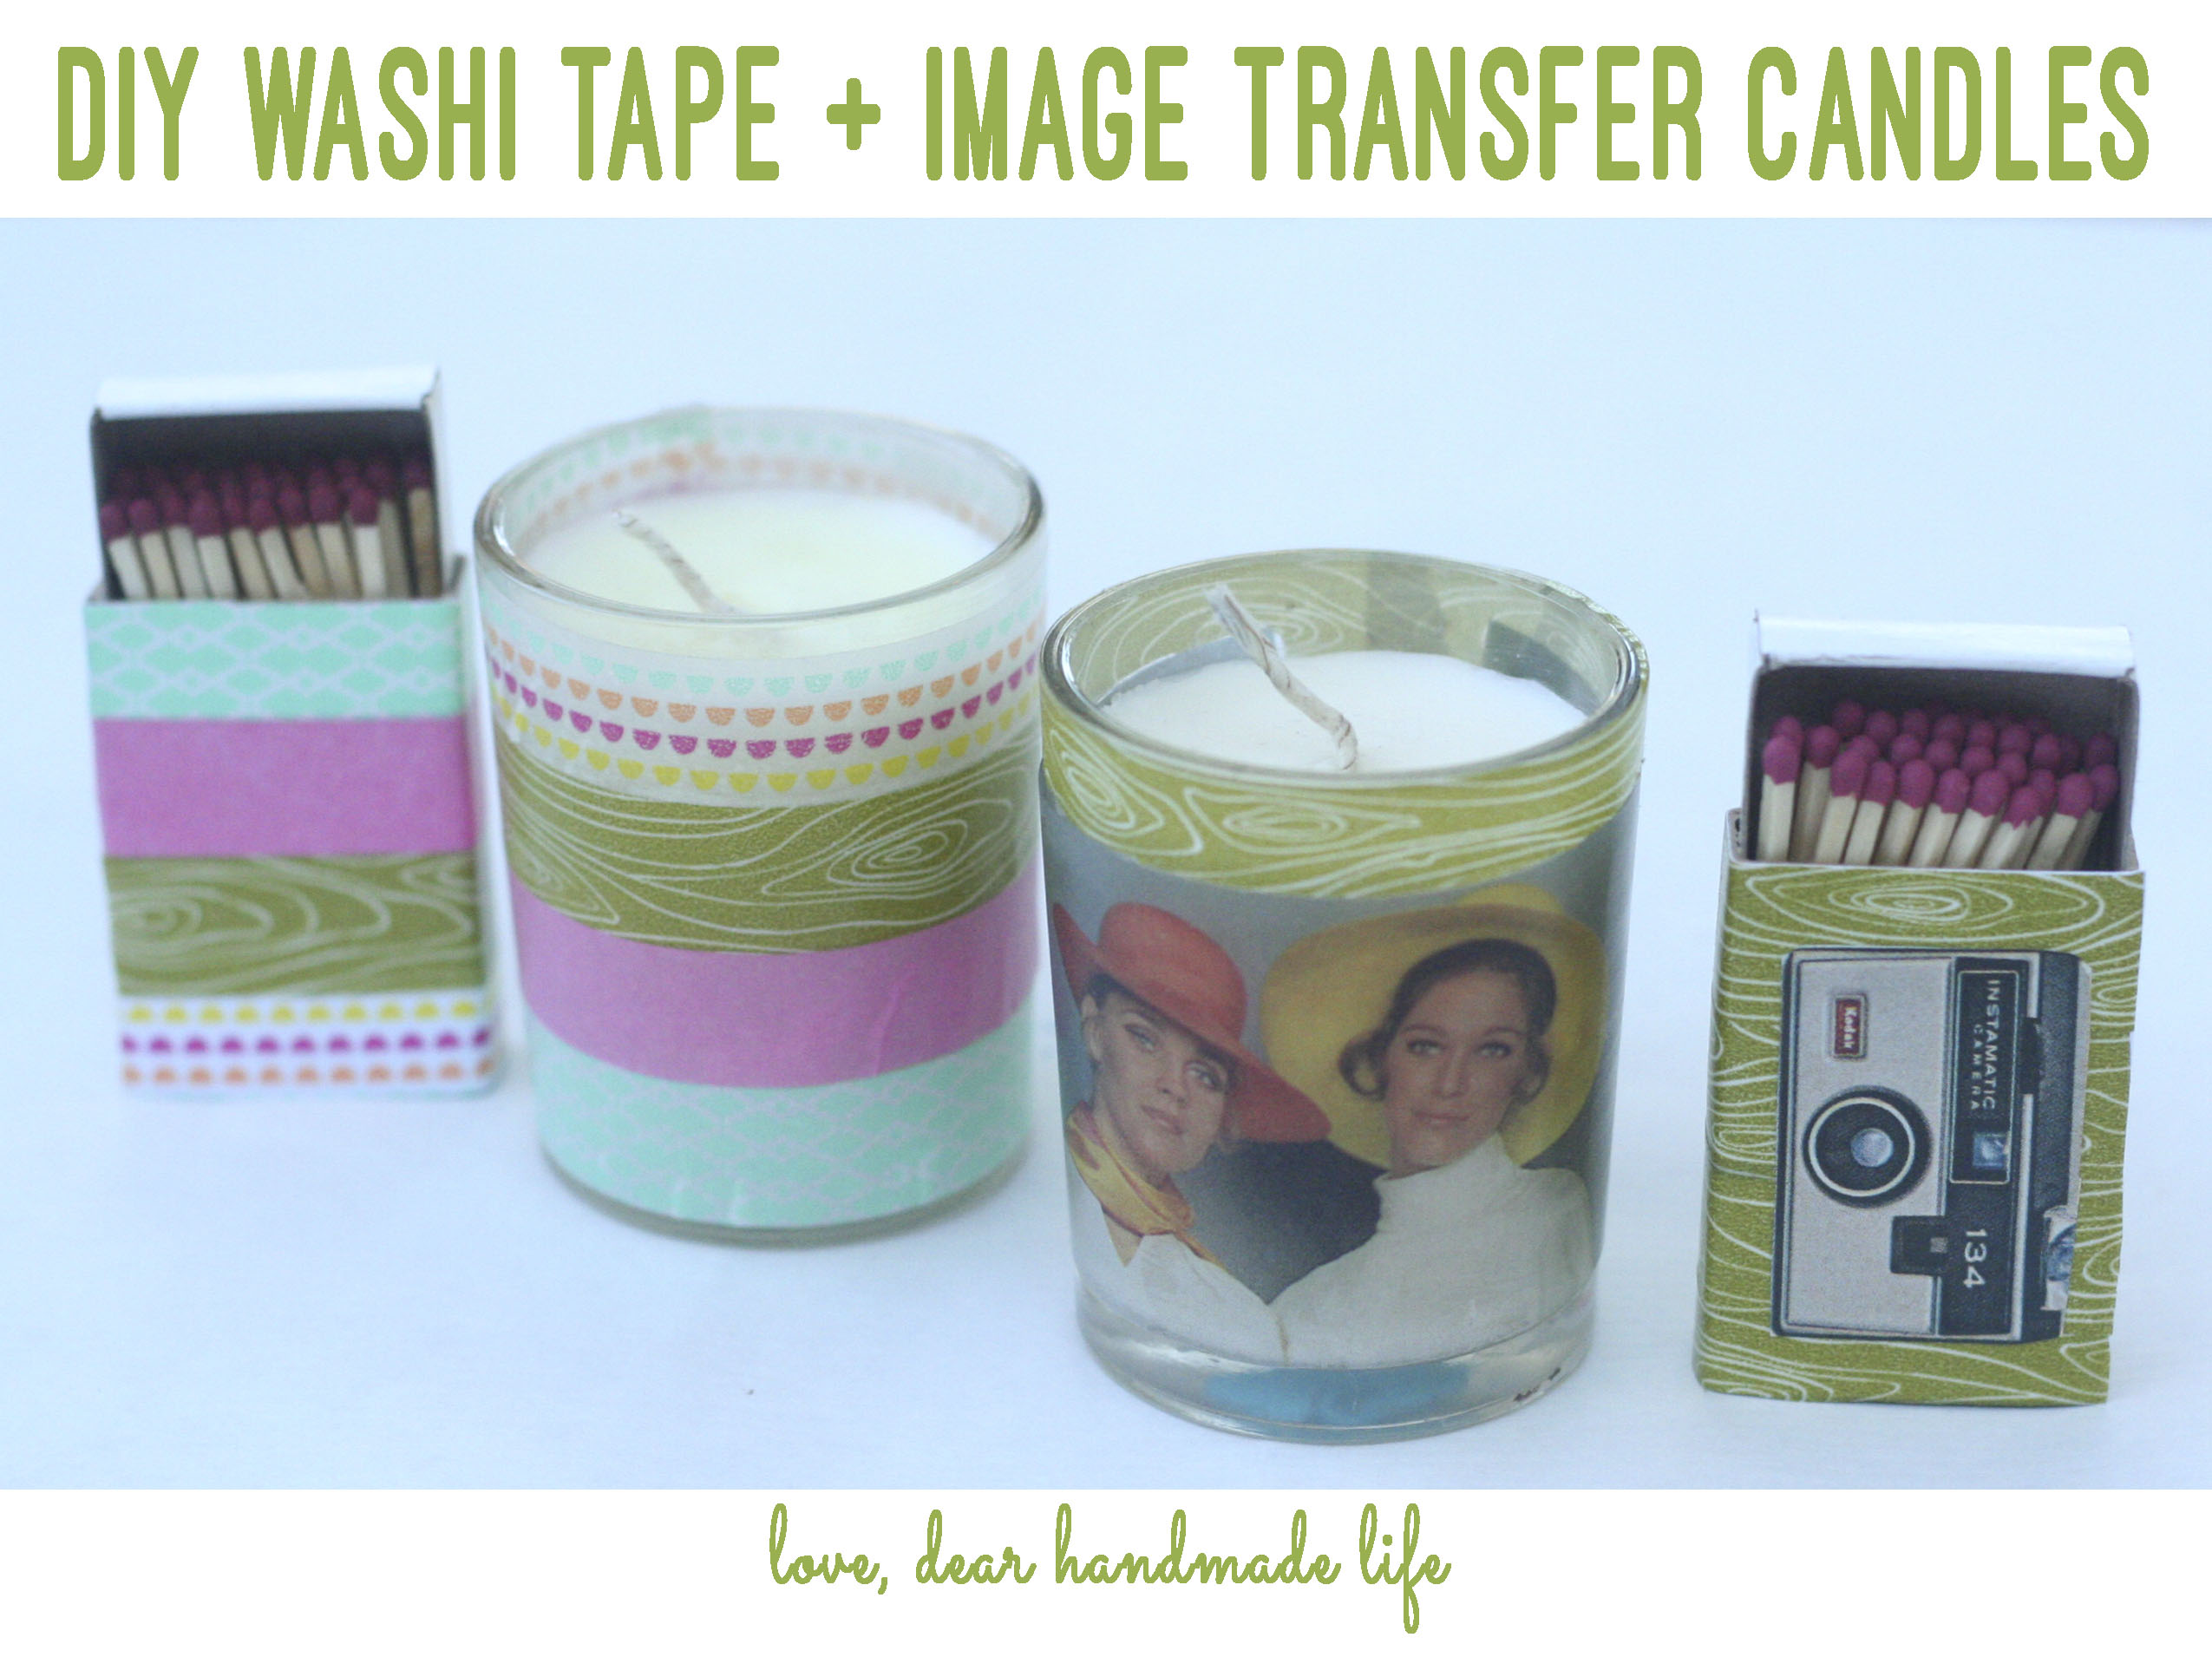
diy washi tape and image transfer candles
When I was 24 I lived in a one-bedroom apartment in Hollywood with five other girls. My friend Paige and I took turns rotating weekly between sleeping on the ‘bed’ we fashioned from two bean bags and an egg crate and on the floor. I’d left San Francisco during my last semester of creative writing grad school for Southern California to be an artist. I didn’t really know what being an artist meant but I felt like I hadn’t seen, tasted, smelled, heard or touched enough of the world to write about it. I was sick of spending my nights waitressing and my days sitting in classrooms listening to my fellow students critique each others work – trying to say the right things about narrative tension and how the purpose of dialogue in a story isn’t to give the reader information but rather to show the relationship between the characters – then desperately glance at our professor for approval.
I’d been making art pretty much my whole life but had never thought I could make a living off it until I started going over to Paige’s apartment to make art, six months before we ended up moving to Los Angeles. The curriculum involved pushing Paige’s Murphy bed into the wall, laying down a paint splattered sheet in the middle of the room and making art until the streets got quiet except for the occasional yelling from people hailing taxis when the bars and restaurants closed. That was our signal to shake the pins and needles from our sleepy petrified legs and walk downstairs to the corner market for a $5 rotisserie chicken. We’d eat the chicken right out of the plastic box, wash it down with gulps of cold beer in tin cans and she’d critique the evenings’ canvases, lecturing me on negative space, composition and the color wheel. I’d been painting so much, I had created enough pieces to tag along in Paige’s group art show. I hung my work in an open corner of the warehouse turned weekend gallery. At the end of the weekend all but one of my paintings had sold. I had a few hundred dollars beaming in my bank account from doing something I actually enjoyed as opposed to waiting tables, which I merely tolerated. Paige had been talking about moving down south, where the rent was cheap and you could sell your art in Venice Beach without a city permit.
That first grueling summer in LA, I sold my tiny wooden paintings—propped up on my comforter on the Venice Beach boardwalk. Six mornings a week, just before sunrise (early birds got the best spots) I’d catch a ride in the worn out truck Paige’s San Francisco ex lent her and we’d haul down the 10 Freeway to Venice Beach. I sank into yet another beanbag, this one wedged in where a passenger seat used to be, sipping coffee in stop-and-go traffic, hoping to sell enough art to tourists for gas money and a burrito.
A few months later, it was winter and we’d done pretty well on the boardwalk but, not well enough to buy Christmas gifts for our family and friends. We decided to make candles since pretty much everyone likes them and we could make them on a budget by upcycling old mustard and olive jars we scavenged from our apartment complex’s recycling bin. We found a place to buy wholesale wax, wicks and scents and spent the next few days pouring soy candles and decorating the jars. Unlike some handmade gifts you get, these were things people would actually use. Plus we got to personalize each one for the receiver – collaging and painting images and shapes that fit their style.
It’s been over a decade since I poured my first candle and it’s still one of my favorite crafts. I’ve taught dozens of candle making workshops since then and I always make a few for myself while I’m teaching. When our friends at Scotch Expressions sent me a box of washi tape to craft with, right away I thought of the two plain candles I had from the last workshop I taught. Scotch Expressions washi tape is perfect for candles since it’s semi-transparent and light comes through when the candle is burning, creating a color-saturated glow. I’m also super obsessed with Craftcation instructor, Courtney Cerruti’s book Playing with Image Transfers and got inspired by her image transfer technique for candles using Scotch shipping tape. Courtney is teaching an image transfer workshop at Craftcation. if you can’t make it to Craftcation check out her upcoming workshops or buy the book and join me in my utter love of it!
You can make the candles yourself. It’s pretty easy: melt soy wax in a double boiler, attach the wick with a wick clip in the bottom of your jar with a glue gun, scent the melted wax, pour into the container and let it set. My favorite spot to get candle supplies is genwax. (We’ll have a detailed post on how to make candles from scratch next month). If you’re not super crafty, you can fancy up store bought candles. You don’t have to be as broke as I was when I made my first candle to appreciate how cost effective this craft is. However if you want the full experience, spend all day in paint splattered jeans trying to sell your art to tourists, eat a cheap burrito, then go home decorate your candles and sleep on a beanbag.
-nicole s.
 what to get:
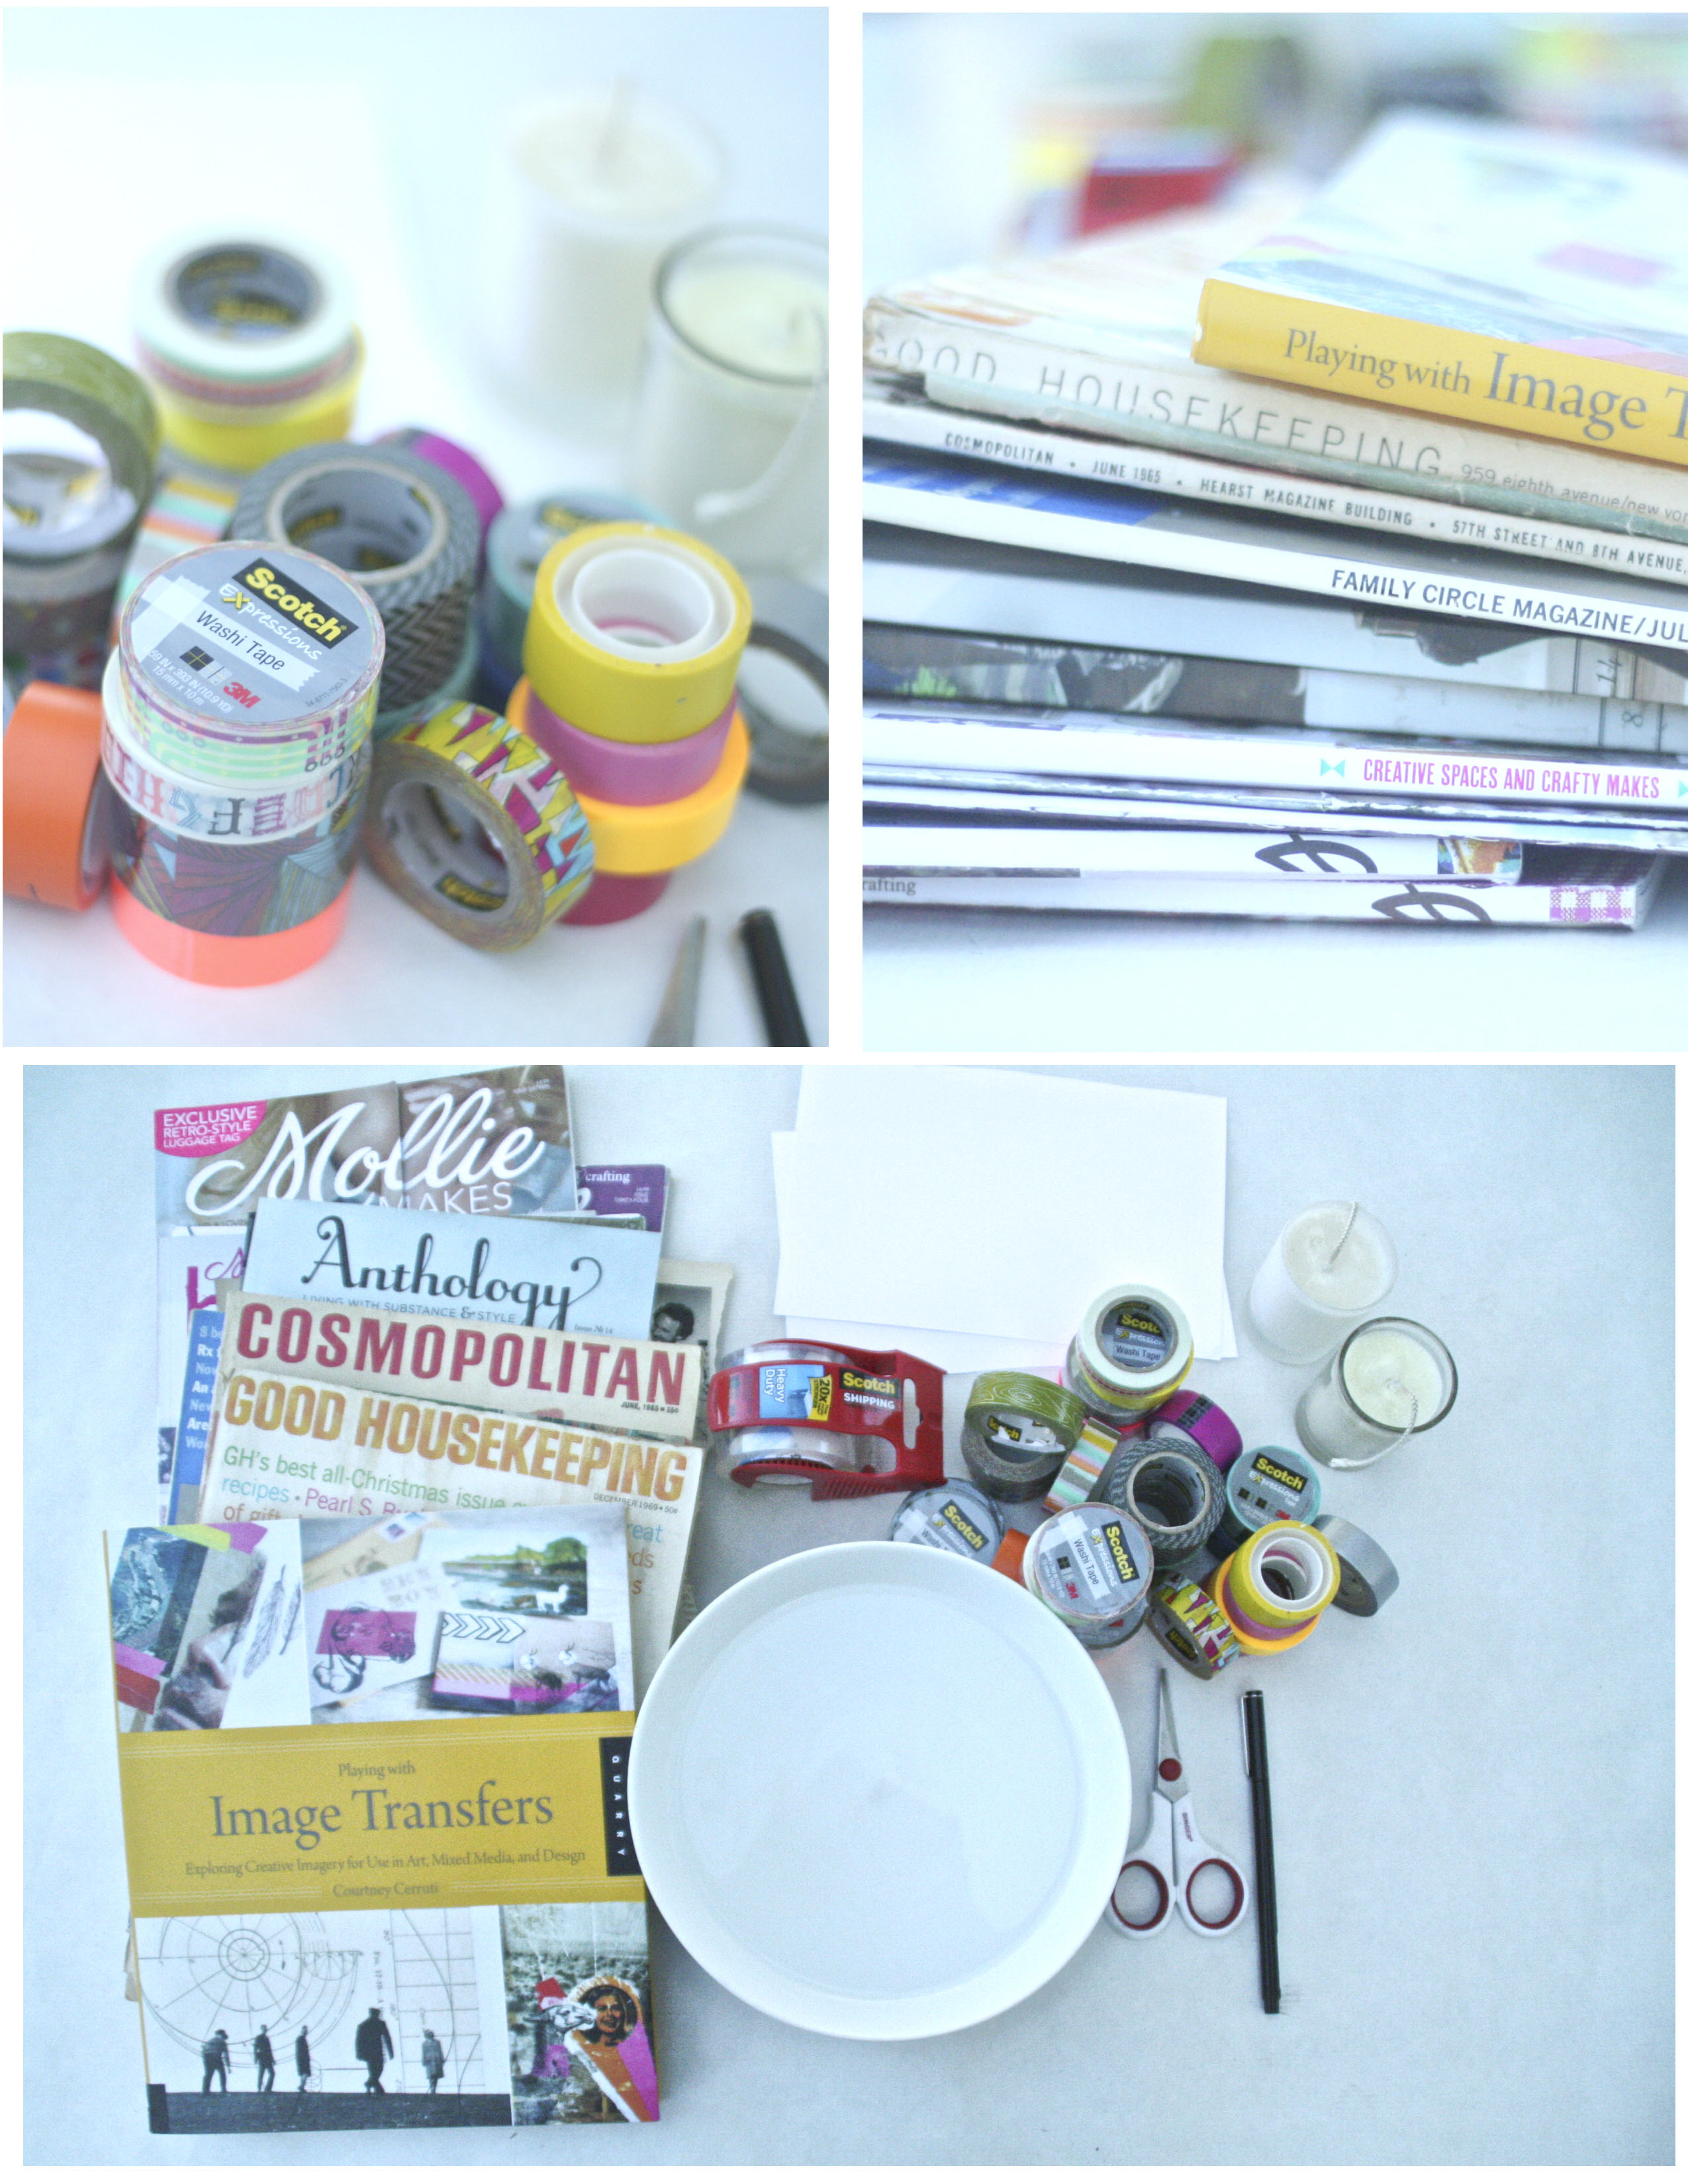
-Selection of magazines (I love picking up vintage magazines at thrift stores).
-Scissors
-Pen
-1 piece of white paper
-Bowl of warm water
-2 candles in clear jars
-Selection of Scotch Expressions washi tape
-Scotch clear shipping tape
-Two matchbooks
-Bone folder (This is a book making tool. If you don’t have one, use can use your finger. I actually used a domino in a pinch last week and it worked really well.)
-Scissors
-Glue stick
what to do:
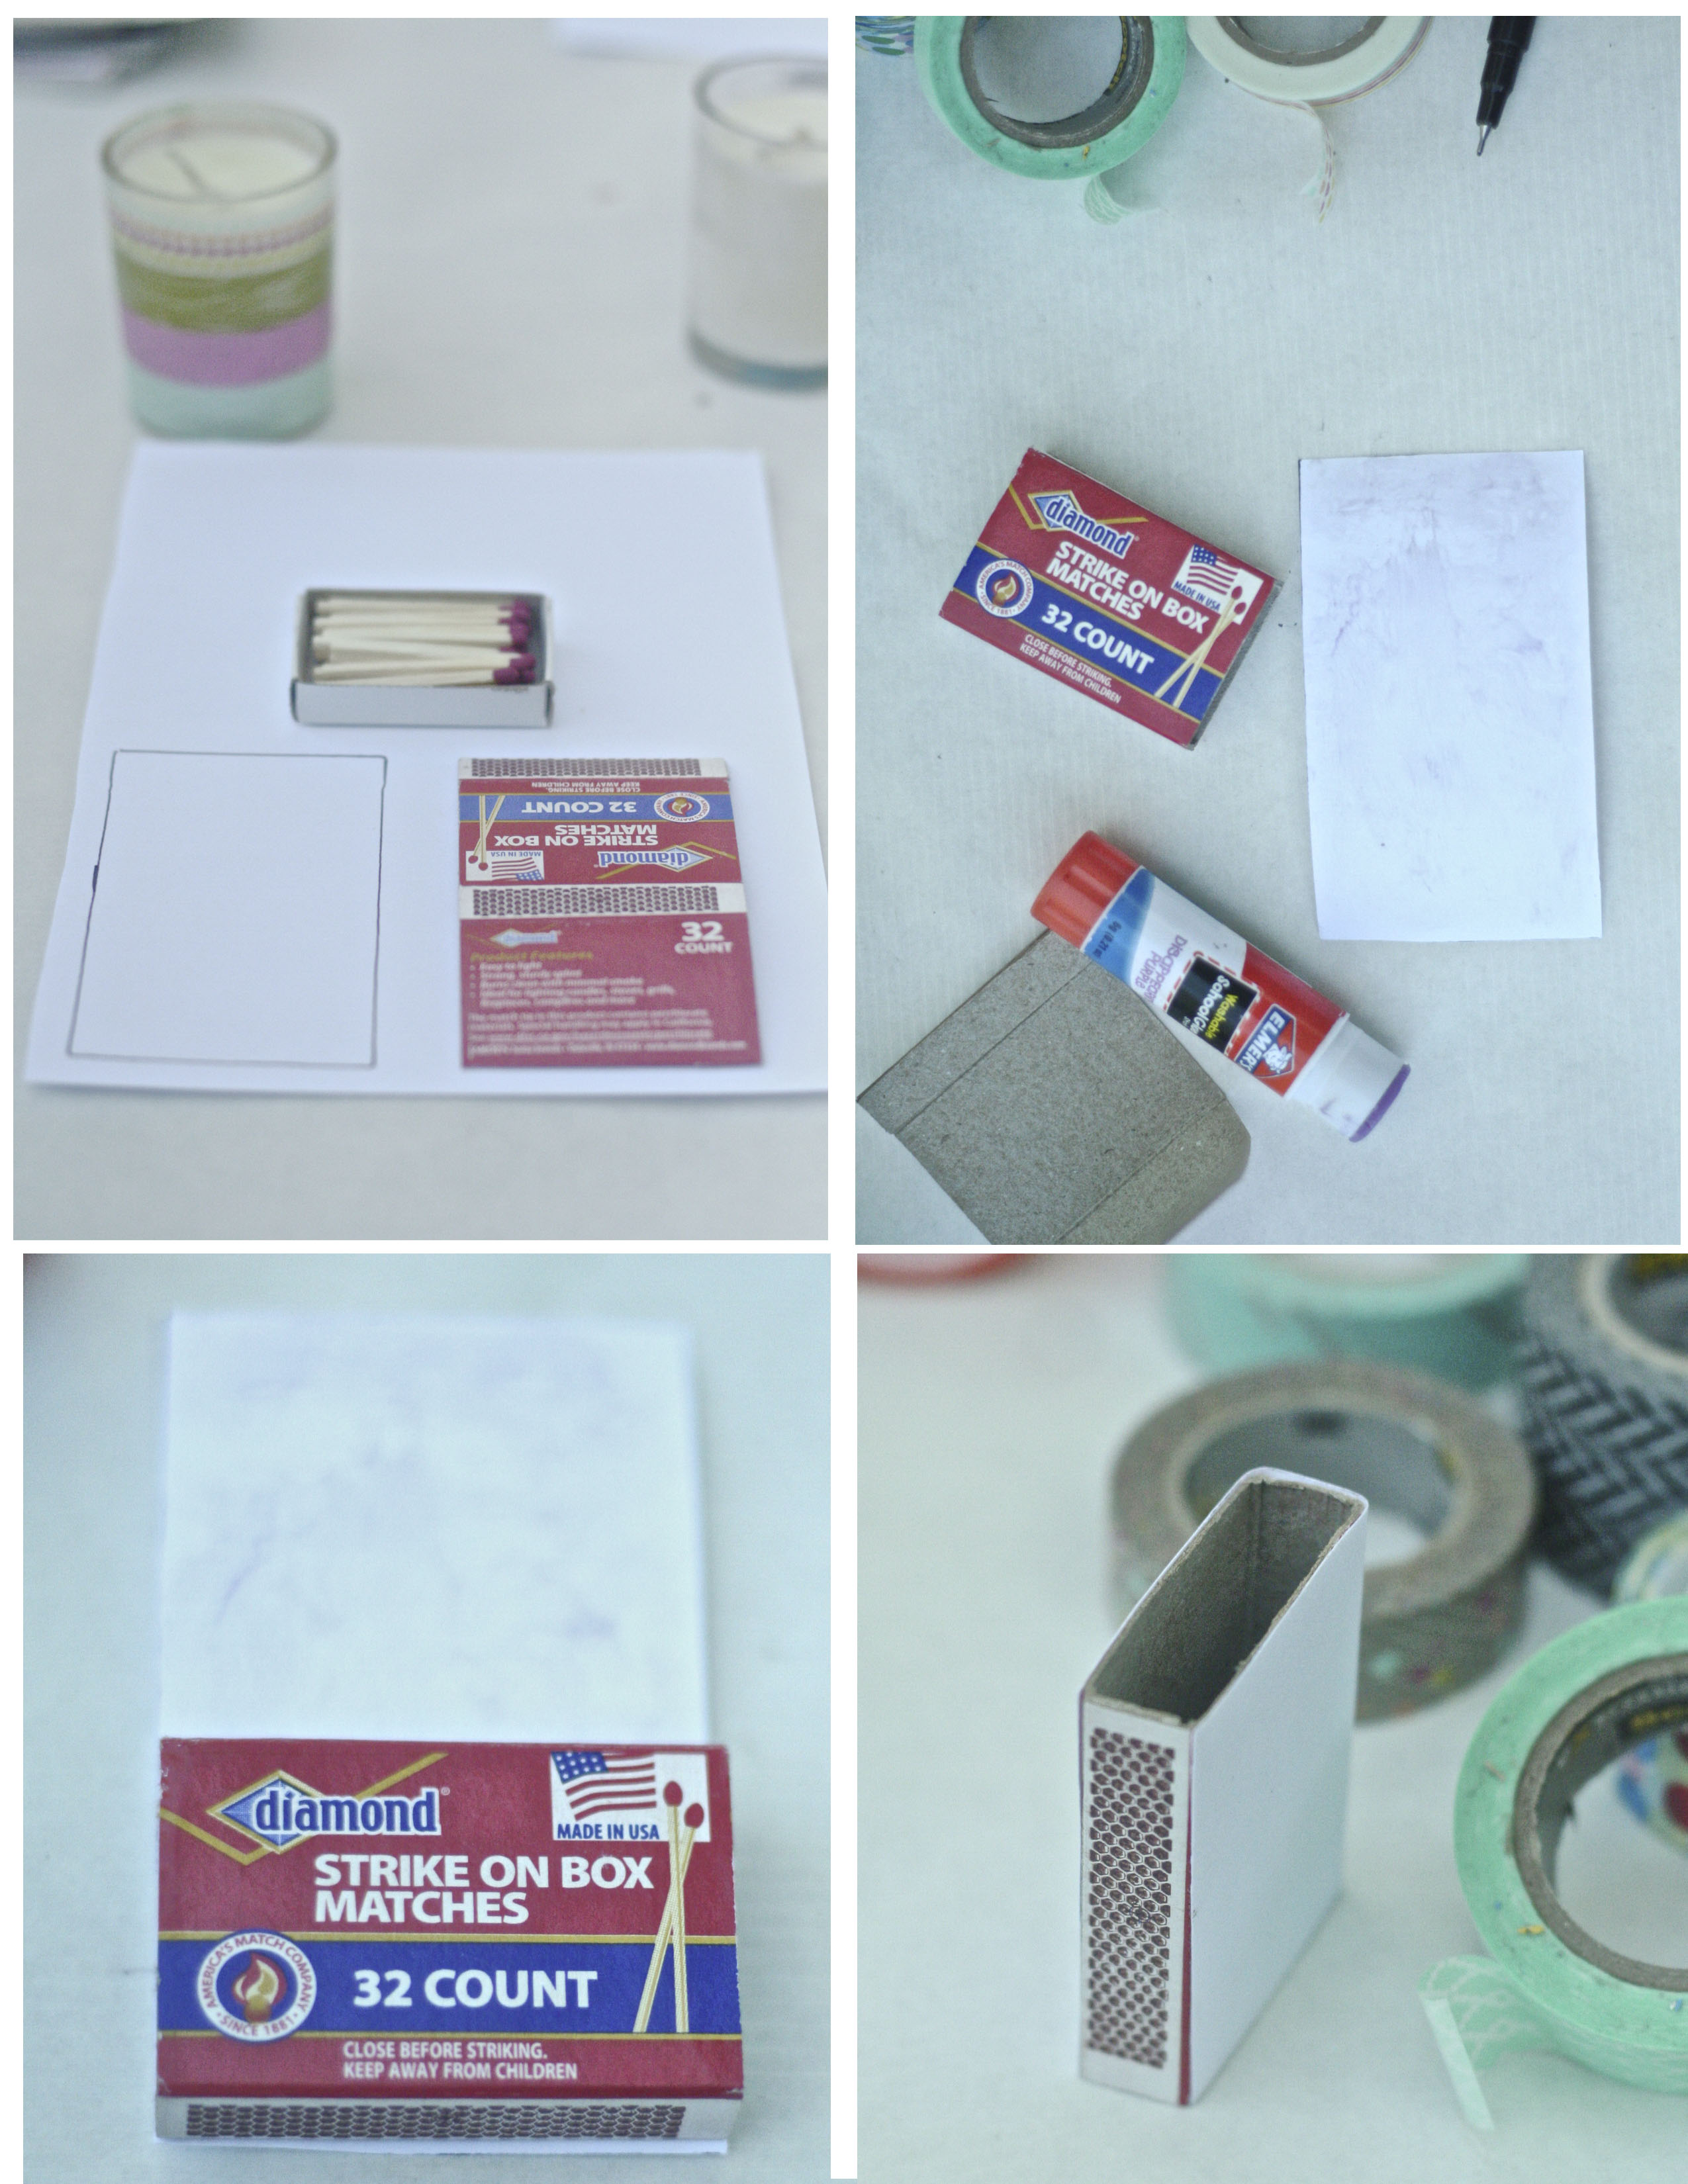
cover the matchbooks
1. Take the cover off the matchbook and cut it on a crease so you can lay it out flat.
2. Trace the matchbook cover on a sheet of plain white paper and cut it out.
3. Using a glue stick, glue the white rectangle to the the outside of the matchbook. Trim the edges.
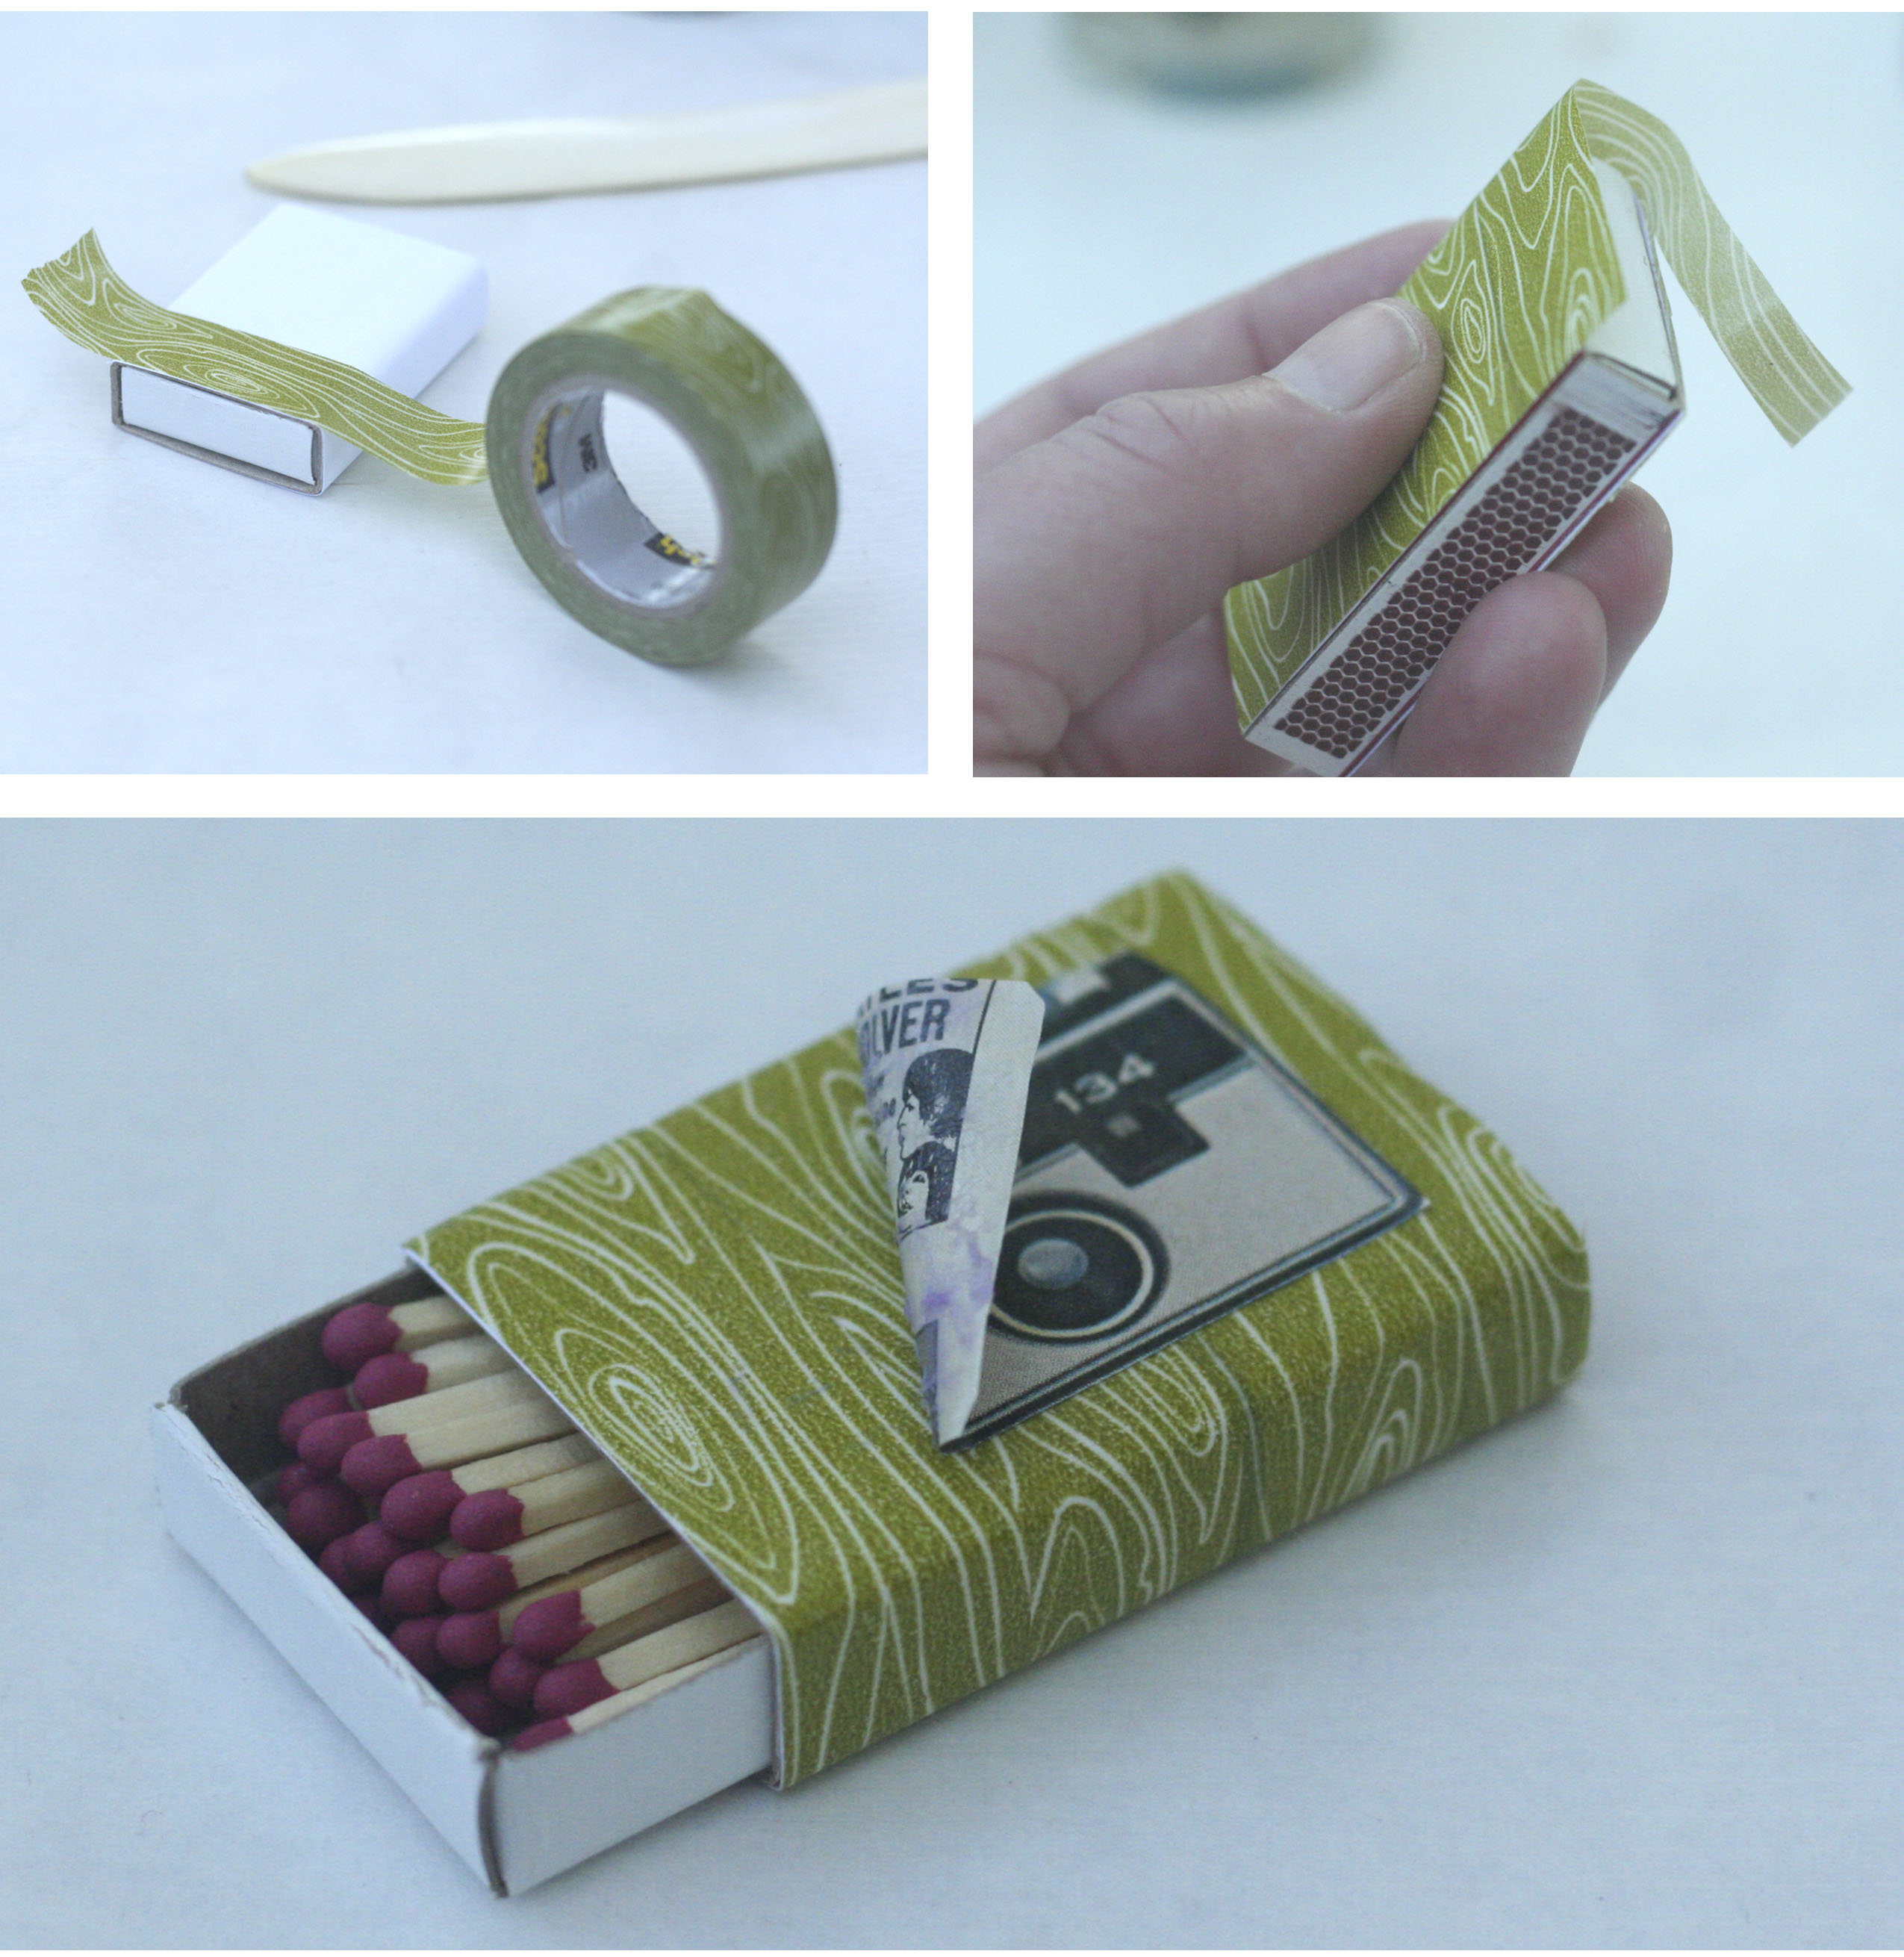
4. Cover the matchbook with washi tape. For the first matchbook I used one tape and then cut out a camera image from a magazine and glued it on top of the tape on the matchbook with a glue stick. For the second matchbook I used four different tapes and alternated them in strips.
cover the first candle with washi tape
 5. For the first candle I used four different washi tapes, just like I did for the coordinating matchbook. I started at the bottom and applied the tape in strips being careful not to overlap any of the strips.
create the image transfer and cover the second candle
 6. Create your image transfer: Put a strip of clear shipping shape over the part of the image you want to use.
7. Using a bone folder (or similar tool) press the tape down hard on the image. When you first put the tape down it will look a bit cloudy but after you press the tape down (burnish) it completely, the image will be clear and shiny.
8. Using warm water, dissolve the paper part of the image. You’ll need to rub it off with your finger but don’t scratch it off or use any tools to remove the paper.
9. Once the paper is off, glue it on top of the candle using a glue stick. I added a thin strip of washi tape to the top so it would coordinate a bit better with the matchbook.

Oh my, Nicole, what a compelling little story you’ve posted. I would compliment you and say that your education in creative writing has stayed with you….but, in that it’s an actual story- from your life- wow. You are a very old sole. I’ve read your various life posts on this blog , and it seems like you’ve lived at least twice as long as your actual years. You’re going to be a great grandmother someday, spinning yarns to the little ones.
Thanks also for the DIY. Your instructions/photos were excellent, and it does, as you say, seem like a gift someone will actually appreciate!
All the best for your day.
Sorry….just re-read my post….edit “sole”; you’re a very old “soul”….. :).
hi keri!
oh my gosh!!! thank you so very much for those sweet words about my story! it means so so so much to me! i love writing and having this blog gives me the opportunity to work some of the stories from my life into our posts and connect them to our projects! i totally suggest you try the image transfer thing in the post. it is so fun!!!
-nicole